Recipe – NZ Pohutukawa Beach Christmas CP Soap
Written by on October 3rd, 2018.
![]() 0 comments
0 comments

We're looking ahead to gifting season with this recipe for nourishing layered soap, inspired by golden sands and the green and pink of pohutukawa trees at Christmas.
1. Start by preparing your ingredients and equipment
 Ingredients:
- 230g organic palm oil, certified organic, RSPO certified (or shea butter, refined, certified organic, fair trade if you want to make it palm free.)
- 230g RBD coconut oil
- 230g rapeseed oil
- 1 teaspoon turmeric powder (from all good food stores)
- 1 1/2 teaspoons gardenia blue powder
- 104g sodium hydroxide
- 230g COLD water
- 1 tablespoon pumice
- 1 teaspoon red mica
- 1/2 teaspoon gold sparkle mica
- 30ml litsea cubeba (for a fresh citrus scent)
Equipment:
- Large stainless steel pot
- Two small bowls
- Protective eye wear
- Gloves
- Heatproof glass jug for your lye mixture
- Thermometer
- Stick blender
- Spatula
- Two medium-sized bowls
- Silicon loaf mould. (If you’re NOT using a silicon mould, you need to prepare your container by greasing it and lining it with baking paper)
- Small sieve (or tea strainer) for dusting mica on top of soap
Be sure to read through the instructions one last time – it can be all go once you get started!
2. Gently melt the solid oils

Add the palm oil and coconut oil to your large pot and gently melt together. Once they're melted take them off the heat and add the rapeseed oil. (Pro tip: by adding the unheated rapeseed oil last, it speeds the process up by cooling the melted oils).
3. Make the coloured oils

Reserve two tablespoons of the melted oil in two separate bowls (one tablespoon in a bowl to be yellow, and another in a separate bowl to be blue/green).
Mix all of the turmeric powder into the oil in one bowl, and mix all of the blue gardenia into the other, and set aside. Mixing the colour with the oil this way prevents clumping.
4. Prepare the lye

Put your gloves and safety glasses on, this is the dangerous part! Sodium hydroxide will burn your skin and clothes if it comes in contact. If it does, don’t panic. Flush the area with water for as long as it takes to take the sting away.
Add the sodium hydroxide to COLD water to create lye. It will heat up a lot, very rapidly, so be careful. Try not to breathe in the fumes, it can be helpful to do this near an extractor fan.
You will have to wait for both your lye and your oil to cool down to 40°C. (Ignore our photos at 60°C.)
4. Combine your mixtures

Once your lye and oil both reach 40°C, pour the lye into the oil. Start stirring with a spatula to gently combine, but then quite quickly progress to your stick blender. It will start to thicken up very quickly.
5. Add the essential oil

When the mixture is getting thicker but before it becomes too thick add the essential oil.
Stir your now fragrant mixture with the spatula. As it gets thicker it will start to "trace", which means as you lift the spatula out of the mixture the bits that fall off will sit on top of the mixture in the pot. See picture three. Once that starts happening you're ready to split the mixture to make the two layers.
6. Divide the mixture 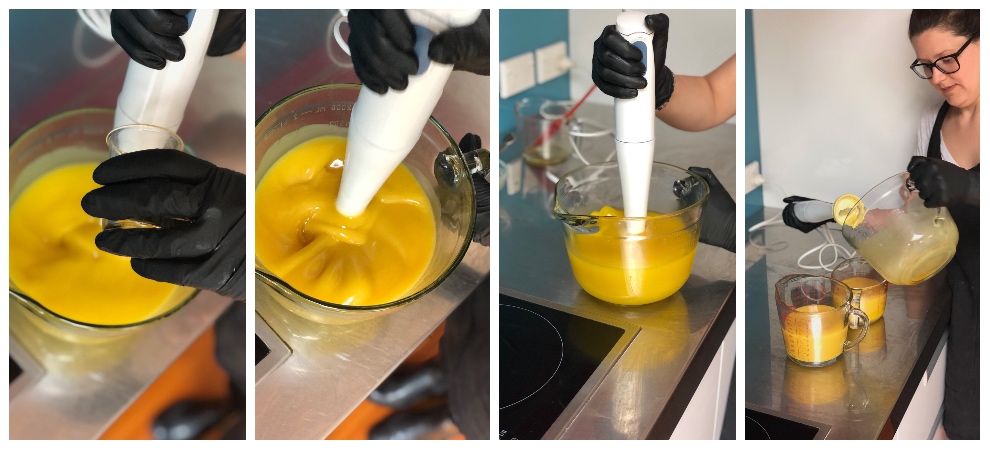
Working quickly, divide the soap mixture unevenly into two, setting aside one third in one bowl, and two thirds in another. These will form the "pohutukawa green" and "golden sand" layers. 7. Make the golden sand layer

Take the larger (two thirds) of the two mixtures and stir in the pumice. Add the yellow turmeric oil. Stir very lightly to create a streaky effect, mimicking sand.
Once mixed to your liking, pour into the mould to form the bottom layer.
8. Make the pohutukawa green layer


Take the remaining mixture and add the blue coloured oil. If the colour isn't dark enough for your liking, add more gardenia blue powder as you mix. Blend with the stick blender until it is quite stiff, so that it sits on top of the first layer easily, forming meringue-like peaks on top.
Pour the layer into the mould, and then use the spatula to form decorative peaks.
9. Add sparkle
Using a small sieve or tea strainer, dust the red mica over the top of your finished soap, covering it completely. Repeat - but more lightly this time - with the gold sparkle mica.
10. Leave to set
For this recipe, there's no need to wrap the soap as you would normally. Instead, simply leave it somewhere safe (up high if there are children in your household) to set for three days.11. Cut the soap

After three days, your soap is ready to cut. Using a kitchen knife or soap cutter, cut into bars. Separate each bar out to cure - we usually arrange them on the shortest side like a line of dominoes.
After six weeks, the bars will be fully cured, and the acidity levels will be balanced enough for use on the skin. Your exfoliating and deliciously fragrant soap bars now ready to use, or give as a gift! Enjoy!
Comments